如何在IOS中实现可折叠/展开的Table Section
![]()
原文链接以及源代码:原文地址
原文作者:Yong Su @ Box Inc.
如何在IOS中实现可折叠/展开的Table Section?!
第一步:准备数据
假设我们有下面这些分好组的数据,每一组是一个 Section 对象
1 | struct Section { |
collapsed 表明了现在是否是折叠状态,默认为false.第二步:设计 Header 和 Cell
在story board中选择 Table View, 选择 Dynamic Prototypes并且设置 Prototype Cells 的值为 2, 一个给我们的自定义 Header,另外一个给我们每一行的 Cell, 然后将各自的 Identifier 设置为为 header 和 cell.
添加一个 UIButton (用做切换折叠状态) 和一个 Label 到 header 的 prototype cell 中, 创建一个继承自 UITableViewCell 的 swift 文件并且命名为CollapsibleTableViewHeader.swift. 这个文件很简单, 有两个 IBOutlets, 一个用做链接切换按钮 (UIButton), 另外一个用做链接 Label. 最后我们设置这个 header 的 Class 为 我们自定义的类 CollapsibleTableViewHeader 并且在类中正确的链接 IBOutlets.
现在这个文件应该看起来像这样:
1 | import UIKit |
创建一个 prototype cell 和一个继承自 UITableViewCell 的类, 有这两点好处:
- 我们能可视化的设计我们的 header
- 我们不需要像这样为了创建一个 Cell 而创建一个 nib 文件 然后在 tableView 中注册他使用:
1 | let nib = UINib(nibName: "TableSectionHeader", bundle: nil) |
个人而言, 我不喜欢在我的项目中有 nib 文件, 并且如果我们用了 dequeueReusableHeaderFooterViewWithIdentifier, 好像我们必须在那个 section 中最少拥有一行 row, 但这里我们需要 0 row!
第三步: UITableViewDelegate
首先,用 sections.count 正确的表示 section 的数量:
1 | override func numberOfSectionsInTableView(tableView: UITableView) -> Int { |
对于那些每个 section 中的 row 的数量, 我们使用 collapsed 变量去控制它, 如果 collapsed 是 true, 我们就返回 0, 否则返回他真实 items 的数量:
1 | override func tableView(tableView: UITableView, numberOfRowsInSection section: Int) -> Int { |
我们使用 tableView 的 viewForHeaderInSection 方法去实现我们自定义的 header:
1 | override func tableView(tableView: UITableView, viewForHeaderInSection section: Int) -> UIView? { |
注意我们为我们的接切换按钮 (UIButton) 注册了一个touch up inside 事件, 一旦这个按钮被按下, 它将会触发 toggleCollapse 方法.
最后, 我们的 row cell 看起来像这样:
1 | override func tableView(tableView: UITableView, cellForRowAtIndexPath indexPath: NSIndexPath) -> UITableViewCell { |
这个是 toggleCollapse 方法:
1 | func toggleCollapse(sender: UIButton) { |
好啦,就是这么简单,如果你需要看源代码,请到顶部原文链接中,你可以在那个链接中找到具体的实现代码
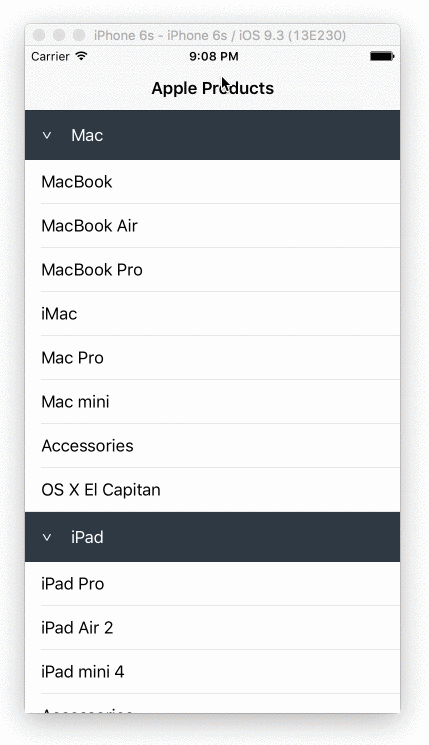
更多的可折叠Demo
有时你可能要在grouped-style table中实现一些可折叠的cells, 我有一些单独的Demo在链接中. 他的实现和今天我们学的这个非常相似,只有一点点小不同,如果有兴趣可以去看下.